How to Use Airtable as a Simple Database
Airtable as a simple database lets anyone organize data without code. Learn 7 easy steps to build one today.
Most people who need a database don’t actually want a database. They want somewhere to keep track of things: clients, inventory, content ideas, job applications, whatever it is, without hiring a developer or learning SQL. That’s exactly where Airtable as a simple database comes in, and it’s why so many small teams and solo founders have quietly replaced their messy spreadsheets with it.
If you’ve ever opened a Google Sheet with forty tabs and no idea what half of them do, you already understand the problem. Spreadsheets are flexible but they fall apart once your data gets complicated. Real databases solve that problem, but they usually come with a learning curve that scares off non-technical users. Airtable sits right in the middle. It looks like a spreadsheet, so it feels familiar from the first click, but underneath it behaves like a relational database, with linked tables, field types, and structured records.
In this guide, I’ll walk you through exactly how to use Airtable as a database, starting from a blank base and ending with a working system you can actually rely on. We’ll cover setup, fields, linking tables, views, automation, and a few mistakes worth avoiding. By the end, you’ll know whether Airtable is the right fit for your project and how to get it running properly.
What Is Airtable and Why Use It as a Database
Airtable is a cloud-based platform that blends the look of a spreadsheet with the structure of a database. Instead of a single grid of cells, you work with “bases,” which function like databases, and each base contains one or more “tables,” which work like the tables you’d find in a traditional relational database system.
Using Airtable as a simple database makes sense for a specific reason: it removes the technical barrier. You don’t need to write a single line of SQL to create tables, define relationships, or query your data. Everything happens through a visual interface that most people can pick up in under an hour.
Here’s what makes Airtable behave like a real database rather than just a spreadsheet:
- Field types beyond text and numbers — you get dropdowns, checkboxes, attachments, linked records, formulas, and more
- Linked records that connect data across tables, similar to foreign keys in SQL
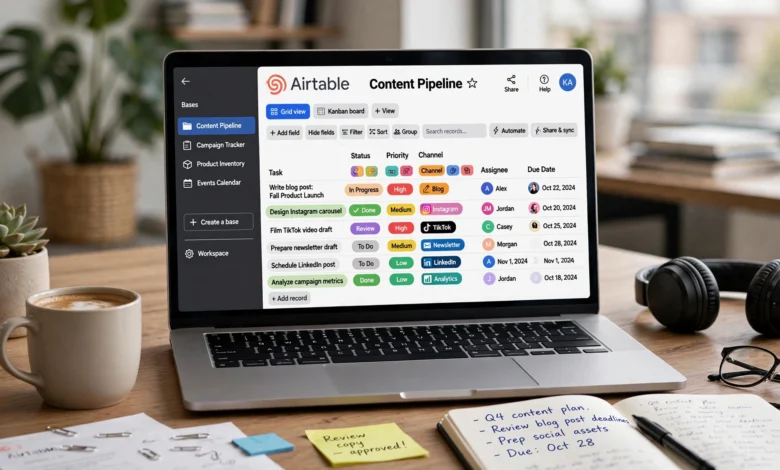
- Multiple views of the same data, including grid, calendar, kanban, and gallery
- A built-in REST API so developers can pull or push data programmatically
- Automations that trigger actions when your data changes
None of this means Airtable replaces a full-scale relational database management system for large, transaction-heavy applications. But for small to mid-sized projects, it’s often more than enough, and it’s a lot faster to set up.
Airtable vs Traditional Databases vs Spreadsheets
Before you commit to building your Airtable database, it helps to understand where it actually sits compared to the alternatives.
A traditional database, like MySQL or PostgreSQL, gives you full control over structure, performance, and scale, but it requires technical knowledge to set up and maintain. A basic spreadsheet, like Excel or Google Sheets, is easy to start with but has no real way to enforce structure, prevent duplicate data, or manage relationships between different sets of information once things grow.
Airtable lands in between these two. It gives you:


- The visual simplicity of a spreadsheet
- The structural logic of a relational database
- The accessibility of a no-code tool
According to a detailed comparison from <cite index=”2-1″>the team at Whalesync, Airtable functions as a relational database because it lets you create relationships between tables through linked records, similar to a VLOOKUP but far more permanent</cite>. That single feature is what separates it from a plain spreadsheet and what makes it genuinely useful as a lightweight database.
If your data is simple and small, a spreadsheet is fine. If you need enterprise-grade performance with millions of rows and complex transactions, you probably need a real DBMS. But if you’re somewhere in the middle, which is most small businesses, freelancers, and internal teams, using Airtable as a database is often the sweet spot.
How to Use Airtable as a Simple Database: Step by Step
Now let’s get into the actual process. Setting up Airtable as a database takes about 20 to 30 minutes if you already know what data you want to track. Here’s the full breakdown.
Step 1: Create Your Base
A “base” in Airtable is the equivalent of a database in traditional terms. To create one, log into your Airtable account, go to your workspace, and click “Create.” You’ll be given the option to start from scratch, import existing data, or use a pre-built template.
If you’re new to this, starting from a template isn’t a bad idea. Airtable has templates for CRMs, project trackers, content calendars, inventory systems, and more. But if your use case is specific, building your own base from scratch will give you a cleaner structure from day one.
Give your base a clear name. This sounds trivial, but if you plan to build multiple bases over time (and most people do), a vague name like “Untitled Base 3” will cause headaches later.
Step 2: Set Up Your Fields (Columns)
Fields are what most people call columns in a spreadsheet, but in Airtable they carry a lot more weight. Each field has a type, and choosing the right type is what makes your Airtable database actually function like a database instead of a plain table.
Common field types include:
- Single line text for names, titles, or short entries
- Long text for notes or descriptions
- Number for quantities, prices, or scores
- Single select / multiple select for categories or statuses
- Checkbox for yes/no fields
- Attachment for files, images, or documents
- Date for deadlines, timelines, or logs
- Linked record for connecting this table to another table
- Formula for calculated fields based on other data
Take your time on this step. A well-planned field structure is the difference between a database that scales cleanly and one that turns into a mess after a few months of use.
Step 3: Import or Enter Your Data
Once your fields are ready, it’s time to populate your table. You can enter data manually, row by row, or import it in bulk. Airtable supports importing from CSV files, Google Sheets, Excel, and even directly from apps like Asana or Dropbox.
According to Zapier’s guide on the platform, <cite index=”7-1″>you can select a destination workspace and then choose the source you want to import from, including uploading a CSV file or syncing directly from Google Sheets or Microsoft Excel</cite>. This makes migrating an existing spreadsheet into Airtable fairly painless, which is a big reason people switch in the first place.
When importing, double check that Airtable mapped your columns to the correct field types. It usually does a good job, but formula fields and linked records need to be set up manually after the import finishes.
Step 4: Link Tables and Records
This is where Airtable as a simple database really starts to earn the word “database.” Linking tables lets you connect related information without duplicating it everywhere.
For example, if you’re running a small CRM, you might have one table for Clients and another for Projects. Instead of retyping client details into every project record, you use a linked record field to connect a project to its client. Update the client’s information once, and it reflects everywhere it’s linked.
To set this up:
- Open the table where you want to add the relationship
- Add a new field and choose “Link to another record”
- Select the table you want to connect to
- Choose whether a record can link to one or multiple records in the other table
This mirrors how foreign keys work in a traditional relational database, minus the SQL syntax.
Step 5: Create Custom Views
A single table often needs to be viewed differently depending on who’s looking at it or what they’re trying to do. Airtable lets you create multiple views of the exact same data without duplicating anything.
Available view types include:
- Grid view, the default spreadsheet-style layout
- Kanban view, useful for tracking status or workflow stages
- Calendar view, ideal for deadlines or scheduling
- Gallery view, good for visual content like products or portfolios
- Timeline and Gantt views, for project planning
Each view can have its own filters, sorting, and grouping settings, so your project manager can look at a kanban board while your finance person sees the same data in a clean grid.
Step 6: Use Filters, Sorting, and Grouping
Storing data is only half the job. A real database needs to help you find and organize what’s already there, and this is one area where Airtable genuinely shines.
- Filters let you narrow down records based on specific conditions, like showing only overdue tasks or active clients
- Sorting arranges your records in ascending or descending order based on any field
- Grouping clusters records together by category, which is especially useful for status tracking or reporting
None of these settings change your underlying data. They just change how it’s displayed, which means you can create as many combinations as you need without any risk of messing up the original records.
Step 7: Automate and Share Your Database
Once your Airtable database is structured and populated, the last step is making it work for you automatically. Airtable’s built-in Automations tool lets you trigger actions based on changes in your data, like sending a notification when a new record is added or updating a field when a status changes.
You can also connect Airtable to hundreds of other tools through native integrations or platforms like Zapier and Make, which opens up options like syncing form submissions, sending Slack alerts, or generating documents automatically.
Finally, sharing is simple. Click the “Share” button on any base to invite collaborators, control their permission level, and decide whether they can edit, comment, or just view. You can also share individual views as read-only links, which is handy when you want to show data to someone outside your team without giving them full access.
Best Practices for Using Airtable as a Database
Once you’ve got the basics running, a few habits will keep your Airtable simple database clean and usable long-term.
- Plan your fields before you build. Sketch out what data you actually need to track before creating tables. Adding fields later is easy, but restructuring a messy base after months of use is not.
- Use linked records instead of duplicating data. If the same information appears in more than one place, that’s usually a sign you need a linked record rather than copy-pasted text.
- Name things clearly and consistently. Vague field names and inconsistent naming conventions cause confusion as your base grows and more people start using it.
- Limit who can edit the structure. Give most collaborators edit access to records, but restrict who can change fields, delete tables, or alter automations.
- Back up important bases. Airtable has version history, but for critical data, periodically export a CSV backup as an extra safety net.
- Keep tables focused. Each table should represent one type of entity, like Clients, Projects, or Tasks, rather than cramming unrelated information into a single sprawling table.
Common Mistakes to Avoid
A lot of people run into the same issues when they first start using Airtable as a database. Here are the ones worth watching for:
- Treating it exactly like a spreadsheet. If you’re not using linked records, filters, and views, you’re missing most of what makes Airtable useful as a database.
- Overcomplicating the base early on. It’s tempting to build every feature at once. Start simple, get comfortable, then add complexity as you actually need it.
- Ignoring field types. Using “single line text” for everything defeats the purpose. Choosing the right field type is what gives you accurate filtering, sorting, and automation later.
- Skipping permissions setup. Without proper access controls, it’s easy for someone to accidentally delete a field or reorganize a table that other people depend on.
- Not testing automations before relying on them. A broken automation can silently fail for weeks before anyone notices. Test new automations on a small sample of data first.
Airtable Database Use Cases
Using Airtable as a database works well across a wide range of scenarios, especially for teams that don’t want to invest in a heavier system. Some of the most common use cases include:
- Simple CRMs for tracking leads, clients, and deal stages
- Content calendars for managing blog posts, social media, or editorial pipelines
- Inventory tracking for small retail or e-commerce operations
- Project management with linked tasks, deadlines, and team assignments
- Applicant tracking systems for hiring pipelines
- Event planning with linked vendors, guests, and budgets
As one guide from Airtable’s own documentation puts it, <cite index=”5-1″>creating a database is the first step to building anything meaningful inside the platform, and the various view configurations let teams give everyone exactly the information they need</cite>. That flexibility is what makes it adaptable to so many different industries and workflows.
If you want to see the official setup process straight from the source, Airtable’s own guide to creating your database walks through the basics in more depth. For a broader look at how the platform fits into general workflows, Zapier’s beginner’s guide to Airtable is also worth a read.
Airtable Pricing and Limitations
Airtable offers a free plan that’s genuinely usable for small projects, along with paid tiers that unlock higher record limits, more automation runs, and advanced features like custom permissions and interface design tools. Pricing changes periodically, so it’s worth checking Airtable’s website directly for current numbers before committing.
As for limitations, it’s worth being realistic. Airtable is not built to handle millions of records efficiently, and very large or complex datasets can slow it down. It also isn’t designed for heavy transactional workloads, like an e-commerce checkout system processing thousands of orders per minute. For those situations, a dedicated database like PostgreSQL or MySQL is still the better tool.
That said, for the vast majority of small businesses, freelancers, and internal team tools, these limitations rarely come into play.
Frequently Asked Questions
Is Airtable actually a database or just a spreadsheet? It’s technically a hybrid. It looks and feels like a spreadsheet, but it includes relational features like linked records, field types, and a REST API, which makes it function as a lightweight database for most everyday use cases.
Can Airtable handle large amounts of data? It can, up to a point. Airtable performs well for small to mid-sized datasets, but very large tables with tens of thousands of records or more can start to feel slower than a dedicated database system.
Do I need coding skills to use Airtable as a database? No. Everything from creating tables to linking records and building automations can be done through Airtable’s visual interface without writing code, though developers can also use its API for more advanced integrations.
Is Airtable free to use as a database? Yes, Airtable has a free plan suitable for small projects. Paid plans add higher limits and more advanced features for larger teams or more demanding use cases.
What’s the difference between a base and a table in Airtable? A base is the overall database, and a table is one dataset within that base, similar to how a single database can contain multiple tables in a traditional relational database system.
Conclusion
Airtable as a simple database gives you a practical middle ground between an overloaded spreadsheet and a full-blown database system that requires technical expertise to run. By setting up a base, choosing the right field types, linking related tables, building custom views, and automating repetitive tasks, you end up with a system that’s organized, easy to maintain, and genuinely useful day to day.
It won’t replace a dedicated database for large-scale or transaction-heavy applications, but for most small teams, freelancers, and internal projects, it does the job better and faster than the alternatives most people default to.